Your analytics stack is dying. Here's what's going to replace it
The monolithic martech stack is collapsing. An open source, warehouse-first intelligence platform is cheaper, more honest, and actually yours.
Steven Elliott•10 Mar 2026

Managing scheduled queries in BigQuery often feels limiting — there’s no version control, no easy collaboration, and scaling can be difficult.
If you’ve ever wondered how to make SQL workflows smoother, Dataform is your answer. In this post, I’ll show you how I migrated a BigQuery scheduled query to Dataform and how it transformed the way I manage my data pipelines.
After all, we all want to know who’s been touching our queries, don’t we?
First thing you need to do is set up a repository and link Dataform to GitHub. If you’re unfamiliar with setting up a Dataform repository, check out my detailed guide on how to set up a Dataform repository with GitHub & Google Cloud integration.
When it comes to moving an existing query to Dataform we want to focus on separating out any large bits of SQL into their own views. This way we can track errors easily if they occur and control the full data pipeline.
Once you have your workspace in Dataform, clear out any example .sqlx files to start with a blank slate. A good structure for any project includes three directories: sources, intermediate, and output.
To create these directories:
sources, intermediate, and output. You do this by adding the name to the end of the directory path.In this directory we want to declare each of the tables that we will reference in our SQL. Each time you create a new directory or file, click the three dots next to the relevant section (e.g., Definitions, Sources) and choose create file. Give the source a name, add this to the end of the file path followed by “.sqlx”. Add code to your new file that looks something like this:
config {
type: "declaration",
database: "[name of project]",
schema: "[name of dataset]",
name: "[name of table]",
description: "[a brief description of what this table is]"
}
You will need to repeat the above for each data source you need for your SQL code.
In this directory we want to create views for any WITH statements or subqueries that exist in our code. Once again, create a file, give the intermediate view a name, and add this to the end of the file path followed by “.sqlx”. The config for this section of code will look something like this:
config {
type: "view",
schema: "[name of dataset you want the view stored in",
tags: ["[any words that might be associated with the table]"],
description: "[brief description of what this code is doing]"
}
The schema refers to the dataset that will be created in BigQuery when the code runs. We create views because they don’t incur storage costs in BigQuery. This means you can manage your data efficiently without worrying about additional charges.
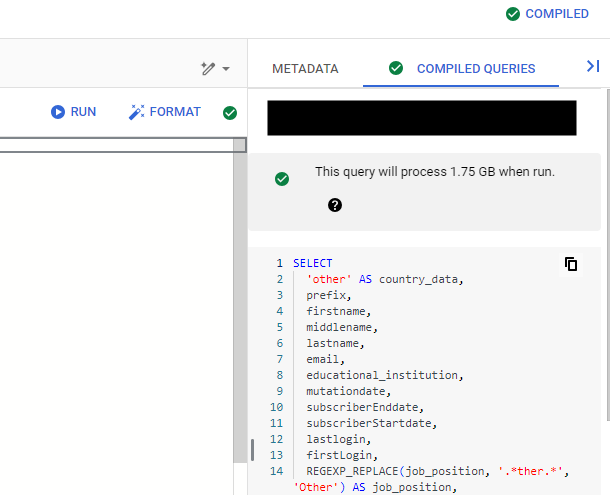
After the config you can add you SQL query as it appears in BigQuery and it will be executed in a similar way. The only difference you want to make to your query is to reference the declaration we created in the source directory within the FROM statement. It should look something like this:
#referencing a sourceFROM ${ref('[name given to the source config]')}
#referenceing a intermediate viewFROM ${ctx.ref('[name given to the intermediate view]')}
You can check what the code will look like in BigQuery by clicking on the compiled queries tab. This will show you what the SQL will look like once it is executed. It will also highlight any errors and what the run GB will be.
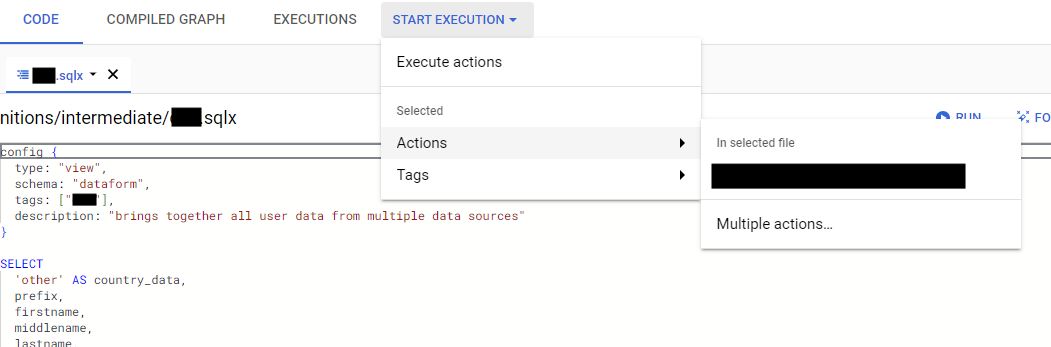
To execute your query and create the view in BigQuery, make sure you are in the intermediate code you want to execute, click on start execution in the top bar, choose actions and choose the code you just created. Click start execution and the view will be created.
You want to repeat the above Intermediate steps for any with statements or subqueries within your code. The ${ref you use in the FROM statement can refer to sources or other intermediate files, this is how we build up the code in BigQuery.
Once we are satisfied that all sources and intermediate tables have been created, we can move on to creating our output files. These will be the final SQL that creates tables in BigQuery. So essentially the final bit of code in our scheduled query. Create a file and give the output table a name, add this to the end of the file path followed by “.sqlx”.
There are a few options you can use for config type here. The main ones are table and incremental. Table is for complete refreshes (just like a CREATE OR REPLACE TABLE), while incremental is for adding new data without touching existing records (like an INSERT INTO or a MERGE (include unique key)).
config {
 type: "table",
 schema: "[name of dataset]",
 tags: ["[any words that might be associated with the table]"],
 bigquery: {
 partitionBy: "[date field you want to partition by]",
 clusterBy: ["[fields you want to cluster by]"]
 },
 description: "[a brief description of what this table is]"
}
Use the above config to create a new table each time the code is run. Add you final SQL code after the config. To execute your query and create the table in BigQuery, make sure you are in the output code you want to execute, click on start execution in the top bar, choose actions and choose the code you just created. Click start execution and the table will be created.
Once everything has been created in Dataform you will need to schedule the pipeline. Google’s guide on scheduling Dataform executions can help you automate your workflows.
Hopefully this will help to get you started on Dataform, and when you are ready you can move on to move complexities with things like assertions, pre and post operations, dependencies and I’m sure a load more that I’m not aware of yet! All of these refer to additional things you can do within the config. But if you are writing SQL already you are half way there.
The monolithic martech stack is collapsing. An open source, warehouse-first intelligence platform is cheaper, more honest, and actually yours.
UK universities face a deficit crisis. Student Recruitment Intelligence can transform Clearing from chaos to precision.
NL-SQL tools can transform how you query data - but only if your foundations are solid. Here's an honest look at what works and what doesn't.