You can't buy data strength. You build it.
Google made data strength central at GML 2026. But it is not a setting you switch on. Here is what actually builds it: consent, server-side, and a warehouse.
Mark Rochefort•21 Jun 2026

Google Analytics 4 (GA4) now gives users the ability to create new events or modify existing events through the use of the GA4 user interface. This is a fantastic add-on available to all and will be welcomed by those who are not familiar with their existing tag management system or do not have the relevant tech resources available to make some changes in a timely manner.
First of all, creating a new event keeps you safe from interacting with existing events that may be powering reports or other business-critical systems. It would be hard to list all the use cases, as there are many reasons why one would want to make use of the game changing feature in GA4.
One obvious reason would be when there is a need to quickly add a new event into the reports where tech resources are not available, or limited. This feature could be used as a temporary fix pending a more permanent update to the tracking code via Google Tag Manager (GTM) or developers. Furthermore, GA4 is designed with app and web convergence in mind, it is easy to imagine that creating events via the user interface is by no means limited to web and can also be extended to app. Most web analysts or analytics consultants (including myself) can be very good at handling web implementation, but not so much when it comes to apps. Unlike before, we now have a powerful tool that helps us remove any blocker related to app development and new version releases.
Before we begin, one key element to mention is to ensure users have the required role in order to ensure tight control of events that are created. Users who can create events need to have either Administrator, Editor or Marketer access level in GA4.
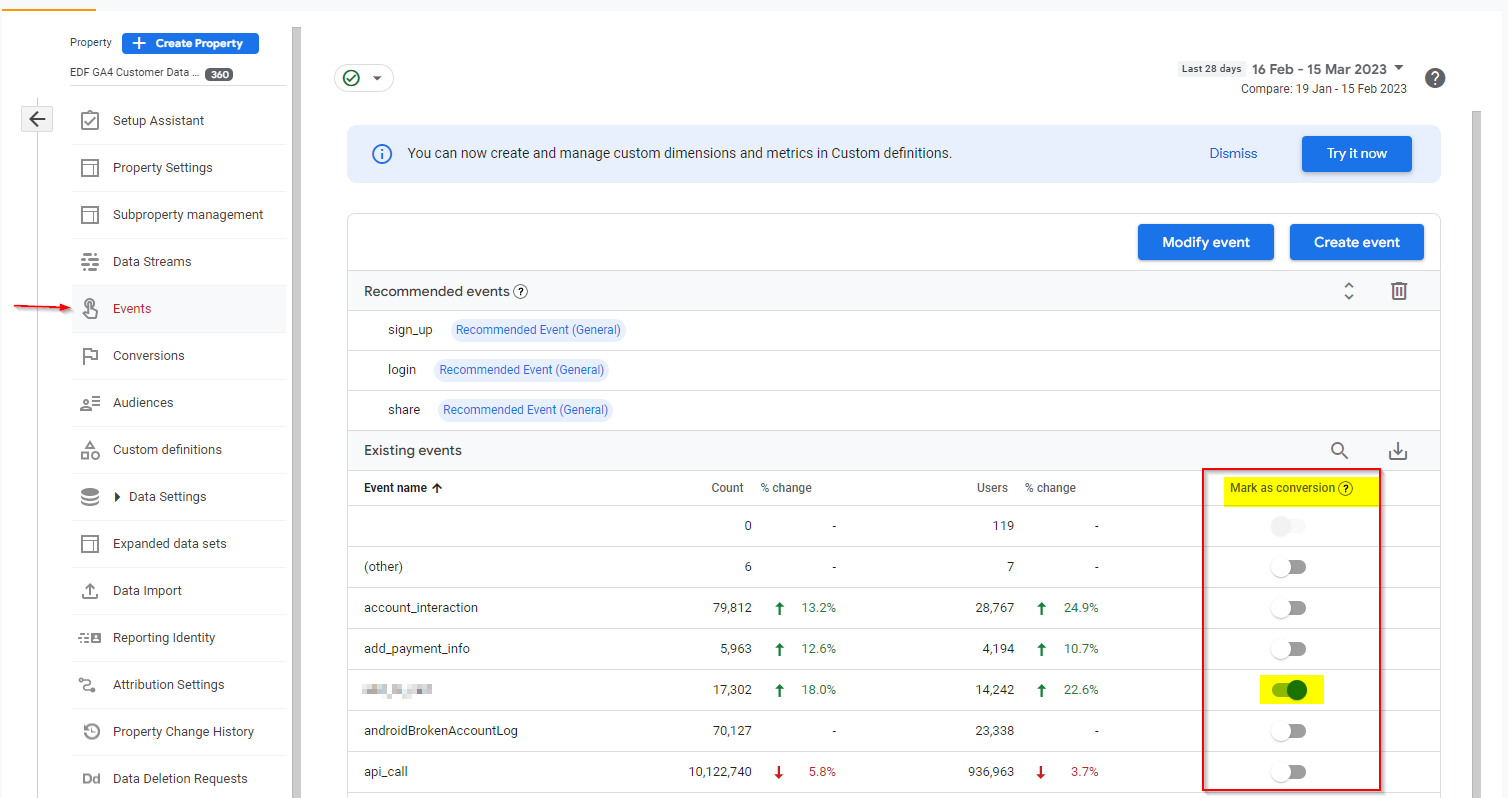
Creating an event supposes the existence of an event in GA4. In order to verify the list of events that are currently tracked in a given GA4 property, please visit Admin > Events:

When clicking on ‘Create event’ you are first presented with a page that shows you all events that have already been created. Continue by clicking on ‘Create’ at the top, to be presented with the page below:

The next steps are as follows:
Further to that, you are also given the option to re-use any parameter of the existing event and set up the appropriate parameter configuration. In most cases, you’ll leave this checkbox ticked. For a detailed description and walkthrough on modifying events, please visit the blog How to modify events in GA4 by Timothy Gorringe.
After you create a new event, GA4 gives you the option to delete if you need to. To do so, you will find a vertical ellipsis at the top of the top right of the screen, click on it and choose ‘Delete’.
If for example, I would like to create a new event called “brochure_request_confirmation” when a user visits any of the following pages:
Then I would use the ‘page_view’ event as the source event, on all pages that contain “brochure” in the URL (i.e. in the page_location parameter). You can even use regex as a matching condition!
From GA4 implementation to server-side tagging and consent management — we'll make sure your data is accurate and complete.
Based on this configuration (see screenshot below), my new event named ‘brochure_request_confirmation’ will be created for each and every page_view event where the page_location parameter contains “brochure”:

After creating your event, you are given the option to mark it as a conversion event. About a day after you have created the event, it will show in the Admin > Events screen where you can mark the event in question as a conversion by toggling the appropriate button.
However if you are unable to locate the event you have created recently, but still want to mark it as conversion, you can navigate to Admin > Conversions screen and click ‘New conversion event’. At this stage you can input the event name (please note it is case sensitive).

You may be wondering why or what is the added benefit of making an event as conversion? If so, do you remember ‘Goals’ in Universal Analytics? If you do, then marking this newly created GA4 event as a conversion allows you to create an equivalent of a Universal Analytics destination Goal! Having said that, please note that Universal Analytics Goals are session-scope, unlike goal conversions in GA4 which are event-scope. I therefore invite you to be mindful, and above all, verify that your GA4 conversion events align with the former Universal Analytics Goals before you sign off your implementation and start using your data (the ‘Validation’ part of our PIVOT GA4 migration process).
Testing that your new event is actually working as you expect is a non-negotiable part, especially when collecting/manipulating data.
There are certainly many ways to ensure the event that has newly been created is yielding the expected result. We will focus on one such way - using the real-time report. GA4 has a built-in real-time feature which allows us to see in near real-time each and every event that has been received and processed in the last rolling 30 minutes.
You may first want to log a few events that meet the requirements of the newly created event (i.e a page containing “brochure” in our example).
Once you have opened GA4, click on ‘Reports’ in the furthest left summary section, followed by a click on ‘Real-time’. The Event count by event name card is the one we are interested in. Assuming we have successfully created the event, this is where we would hope to see our newly created event.


As handy as it can be in speeding up the implementation of new events, it is important to be aware of some restrictions around event creation:
If you are reading this section, you have probably managed to get through each and every line above. Well done! It is now your turn to experiment with the event creation tool via the GA4 user interface. Remember, each implementation requires testing, just to make sure you did it correctly, but on top of that, so you do not miss days of data.
This new feature from GA4 is game changer, it grants non-technical minded users the ability to perform some minor and some major changes pending implementation from a technical specialist. If you have any questions about how to use this feature, or would like to chat about ways we can assist you in this, please get in touch.
From GA4 implementation to server-side tagging and consent management — we'll make sure your data is accurate and complete.
Our instant analytics audit scans your GA4 configuration and flags what's missing, broken or misconfigured.
Google made data strength central at GML 2026. But it is not a setting you switch on. Here is what actually builds it: consent, server-side, and a warehouse.
Dara and Matthew recap 2025 with 12 top highlights, AI, analytics, and the best moments on The Measure Pod.
AI expert Daniel Hulme, founder of Satalia, shares his journey from UCL PhD to entrepreneur, discussing AI, consciousness & deep tech.